Fastly Deployment Guide
Overview
As a Fastly user, you can deploy HUMAN’s BotGuard for Applications solution without modifying your front-end or back-end code.
We leverage Fastly's Compute@Edge technology to integrate our BotGuard for Applications solution. For each request made to your site, one or both of the following actions are performed (according to the agreed-upon configuration):
- HUMAN’s detection tag is injected into the HTML of the relevant page(s).
- For each protected event submission, a request is sent synchronously from Fastly to the HUMAN Mitigation API. Based on the Fastly configuration and the HUMAN response, one of the following happens:
- (A) Your request HTTP headers are annotated with the details of the HUMAN response, or
- (B) the original client request is blocked with a preconfigured HTTP response.
Requirements
To get started, you will need:
- A Fastly account with access to the Rust Compute@Edge feature.
- A domain name server (NS) record configured to the appropriate Fastly nameserver, as specified in this Fastly Guide.
- An integration call with your HUMAN representative to provide details about the interaction(s) you would like to protect (sign-in, sign-up, web form, play/like, etc.) and the mode you would like to deploy (Passive Non-Interactive, Passive Interactive, Active). This information will be used to customize your Fastly Compute@Edge application code for maximum detection results.
Content Retrieval
A HUMAN representative will share the following 3 components with you by email:
- Wasm package: the Edge application code (tar.gz file),
- human_security_configuration dictionary: your JSON configuration,
- Your human_security_url to configure the human_security backend server
Deployment
To deploy the Fastly Compute@Edge integration, you’ll need to create a Rust Compute@Edge application, configure the dictionary, configure the origin servers, and activate the service. Optionally, you can also configure the log endpoint prior to activating the service.
Create a Rust Compute@Edge application
Your first step is to create a Fastly Compute@Edge application in Rust. This application will run HUMAN’s web assembly package for every client request received by your server. To create this application:
- Log in into your Fastly account.
From the home page, open the Create service drop-down menu and select Wasm service.

Rename the service to something easily recognizable and accessible. Example: “human-contactform” instead of the auto-generated name “white-frog-9e98”.

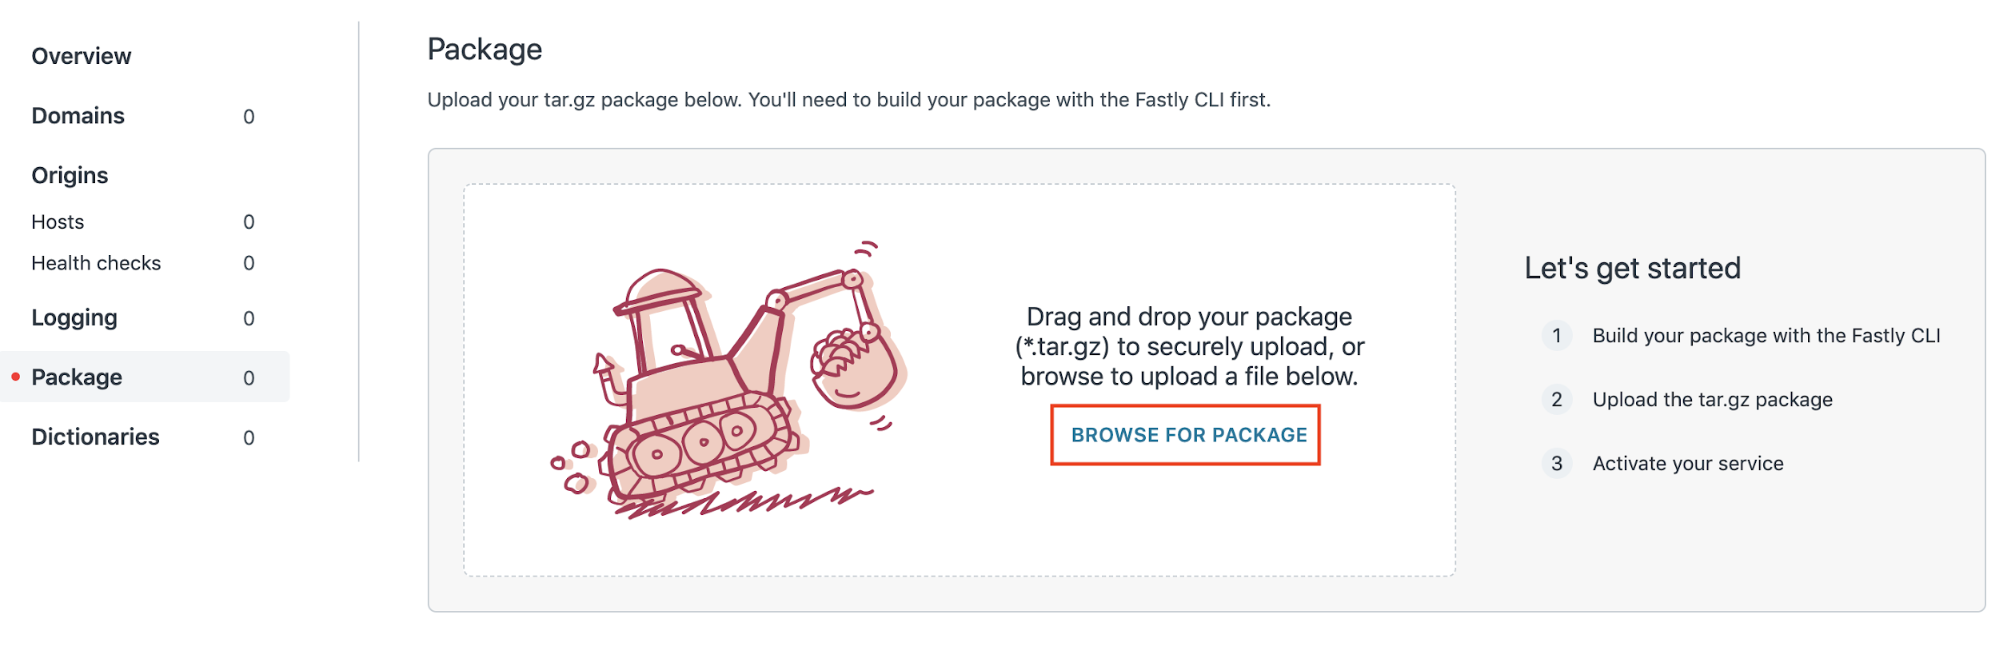
From the Package tab, select Browse for package to upload the tar.gz package you received from HUMAN.
You now have HUMAN’s code in your Edge application. Next, you will need to configure your Edge application with your unique client data.
Configure the Dictionary
The Edge application loads its configuration from a Fastly Edge dictionary at runtime. To configure the application dictionary:
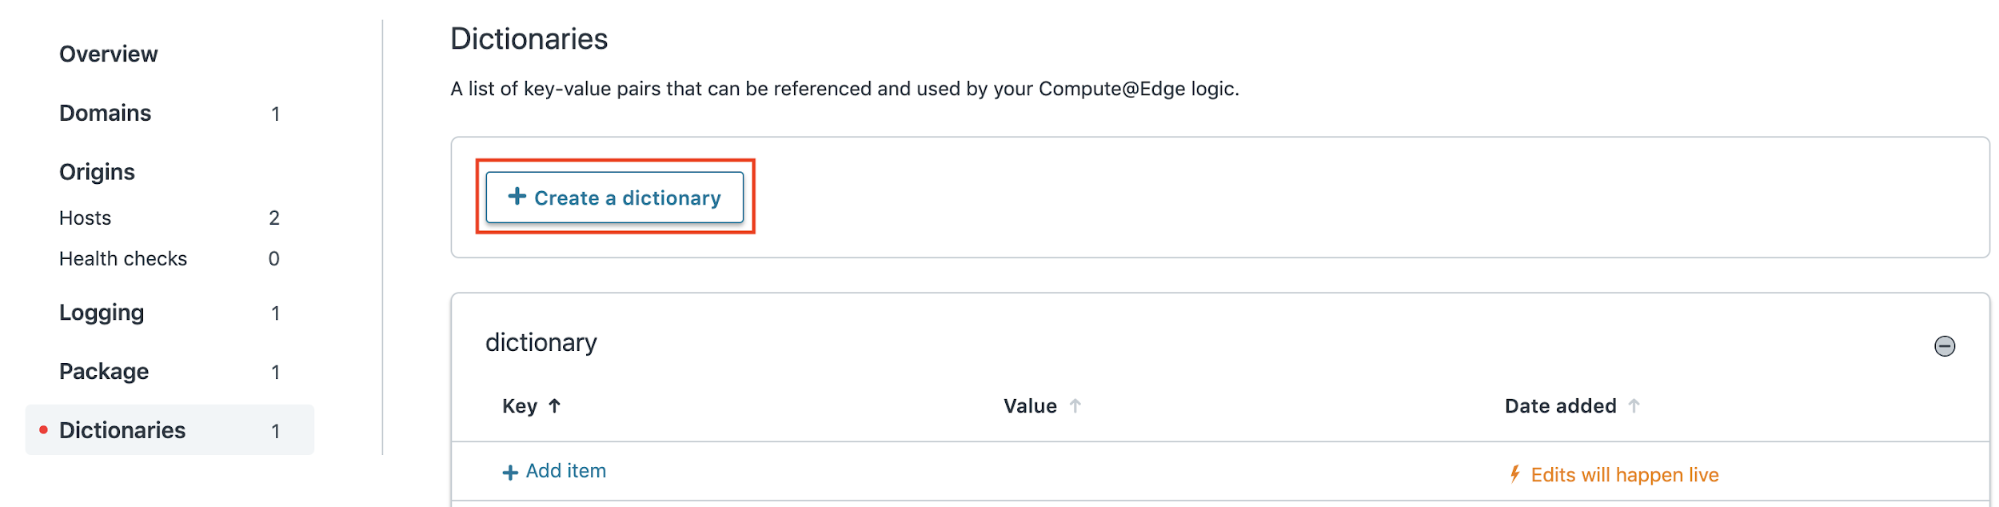
Navigate to the Dictionaries tab of the service sidebar, then select Create a dictionary. Enter the name human_security_configuration, then select Add.
Add a single entry with the key “config” and the value of the JSON payload provided by your HUMAN representative. For example, your configuration may look something like this:
{
"apiKey": "",
"customerId": "845155",
"humanSecurityUrl": "http://107.22.12.64:8081/",
"siteId": "active-tyfxks",
"tagId": "8451551584148378445000",
"tagOrigin": "https://s.analytics.tyfxks.com",
"authorizationHeaders": {
    "some-header-name": "some-header-value"
},
"fastly": {
    "requestMaxHeaderNameBytes": 64,
    "requestMaxHeaderValueBytes": null
},
"routes": [
    {
        "includedPathRegex": "^/block$",
        "methods": [
            "GET"
        ],
        "eventType": 0,
        "action": {
            "type": "askHuman",
            "usernameRequestField": {
                "source": "body",
                "key": "/asdf"
            },
            "requestFieldsToForward": [
                {
                    "source": "body",
                    "key": "/a",
                    "postProcess": "sha1"
                },
                {
                    "source": "cookie",
                    "key": "b"
                },
                {
                    "source": "header",
                    "key": "c"
                }
            ],
            "blockWith": {
                "body": "blocked",
                "status": 401,
                "headers": {
                    "test": "whatever"
                }
            }
        }
    },
    {
        "includedPathRegex": "",
        "methods": [
            "GET"
        ],
        "eventType": 0,
        "action": {
            "type": "rewriteHtml",
            "deployTag": {
                "mode": "noninteractive"
            }
        }
    }
]
}
The structure of the configuration is as follows:
- humanSecurityUrl: The URL of HUMAN’s server. Only required when deploying in Active mode. This value must be consistent with the “human_security” value configured below in Origins.
- customerId: Your HUMAN customer ID.
- apiKey: Your HUMAN Mitigation API key.
- siteId: The site ID provided by your HUMAN representative.
- tagId: The tag ID provided by your HUMAN representative
- tagOrigin: The tag origin (protocol, host, and port, e.g. “https://google.com”) provided by your HUMAN representative.
- authorizationHeaders: (optional) The JSON object of header name / value pairs to attach to the incoming request.
- fastly: (optional) An object containing Fastly limits. The following fields are accepted. See https://docs.rs/fastly/0.7.3/fastly/limits/index.html for details. If
null, the value will be treated as unlimited. If omitted, the value will be treated as the default.- requestMaxHeaderNameBytes: (optional)
- requestMaxHeaderValueBytes: (optional)
- requestMaxMethodBytes: (optional)
- requestMaxUrlBytes: (optional)
- responseMaxHeaderNameBytes: (optional)
- responseMaxHeaderValueBytes: (optional)
- backendHeaderKey: (optional) The header key to send the backend server (e.g. to create stickiness).
- overrideHostHeaderKey: (optional) The header key to set the Host header (useful for service chaining with VCL in front).
- log_level: Must equal one of the following values. If not defined, it defaults to “ERROR”:
- OFF
- ERROR
- WARN
- INFO
- DEBUG
- TRACE
- routes: An ordered array of routes. The first route to match the incoming request is used to proceed. If no routes match, the request passes through without any intervention. Each route contains the following subfields:
- methods: (required) An array of HTTP methods. The incoming request’s method must match one of these to match the route.
- includedPathRegex: (optional) The request URL path must match this pattern to match the route. If absent, defaults to a pattern that matches all possible URL paths.
- excludedPathRegex: (optional) The request URL path must NOT match this pattern to match the route. If absent, defaults to a pattern that does not match any possible URL path.
- query: (optional) A JSON object of URL query parameters, mapping string keys to string values. These must be present in the incoming request query parameters to match the route.
- eventType: (required) The integer event type.
- action: (required) A JSON object describing the action to take. Must be one of the following. For the “active” case, the additional fields configure the interaction with the HUMAN Mitigation API.
- {“type”: “rewriteHtml”, ...}. The Edge application will rewrite the HTML received from the customer server. This action has two optional configuration objects.
- deployTag: (optional) If set, the HUMAN tag will be injected into the page. The following nested fields are also available to configure how the injection happens.
- mode: (required) Must be one of the following.
- noninteractive: (mo=0)
- interactive: (mo=1)
- active: (mo=2)
- spa: (optional) Boolean indicating whether the protected site is a single page application (SPA) or not. Defaults to
false. - c<1..10>, r<1..10>: (optional) String C-and-R fields to include in the HUMAN tag.
- mode: (required) Must be one of the following.
- overwriteAffiliateLinks: (optional) If set, links on the page will be protected. Please contact a HUMAN representative for more information.
- cssSelector (required) CSS selector matching links to protect. Regardless of the content of this field, whatever is matched in the HTML will have its
hrefattribute encrypted and overwritten. Multiple CSS selectors can be combined with ", ", e.g. "a.class1[href], a.class2[href]".
- cssSelector (required) CSS selector matching links to protect. Regardless of the content of this field, whatever is matched in the HTML will have its
- deployTag: (optional) If set, the HUMAN tag will be injected into the page. The following nested fields are also available to configure how the injection happens.
- {“type”: “askHuman”, ...}. The Edge application will make a request to the HUMAN Mitigation API. Additional fields described below can be configured.
- usernameRequestField: (optional) Request field1 to use as the username in the call to HUMAN.
- requestFieldsToForward: (optional) Request field1 to forward in the call to HUMAN. These request fields contain an additional optional field,
"destination", to be used as the key under which the extracted field will be inserted in the body of the call to HUMAN. - ozSource: (optional) A field to specify where to extract the OZ parameters from. One of the following:
- {"body": {"prefix": ...}}: Extract from the body, using the given prefix. Prefix is optional.
- "cookie": Extract from cookies.
- "header": Extract from headers.
- extraHtmlToInject: (optional) Extra HTML to inject into the head following the tag.
- ipRequestField: (optional) Request field1 to use as the IP in the call to HUMAN. For Fastly, this usually corresponds to the header "Fastly-Client-IP".
- policyName: (optional) If configured, specify the name of the policy for the Policy Engine.
- blockWith: (optional) If set and the HUMAN Mitigation API flags the incoming request as bot, the request will be blocked with a response configured by the following required fields:
- body: A string to use as the body in the blocking response.
- status: An integer to use as the HTTP status code in the blocking response.
- headers: An object, associating HTTP header names / values to use in the response. E.g. {“content-type”: “text/html”, “location”: “https://google.com”}
- debugVesperBody (optional): If true, the Vesper response will be formatted at the end of the blocking response body for debugging purposes.
- {“type”: “rewriteHtml”, ...}. The Edge application will rewrite the HTML received from the customer server. This action has two optional configuration objects.
1 Request field is a pattern to extract arbitrary data from the incoming HTTP request. It is a JSON object with the following fields:
- source: (required) One of "body", "cookie", or "header".
- key: (required) A string indexing into the source. If the source is "body" and the request body is JSON, JSON pointer notation is used (e.g. "/key"). See rfc6901 for details.
- postProcess: (optional) One of the following:
- raw: (default) No post processing.
- sha1: SHA1-hash the value.
- isEmpty: "true" if the value is not found, "false" if it is.
- base64Decode: Base64-decode the value.
- percentDecode: Percent-decode the value.
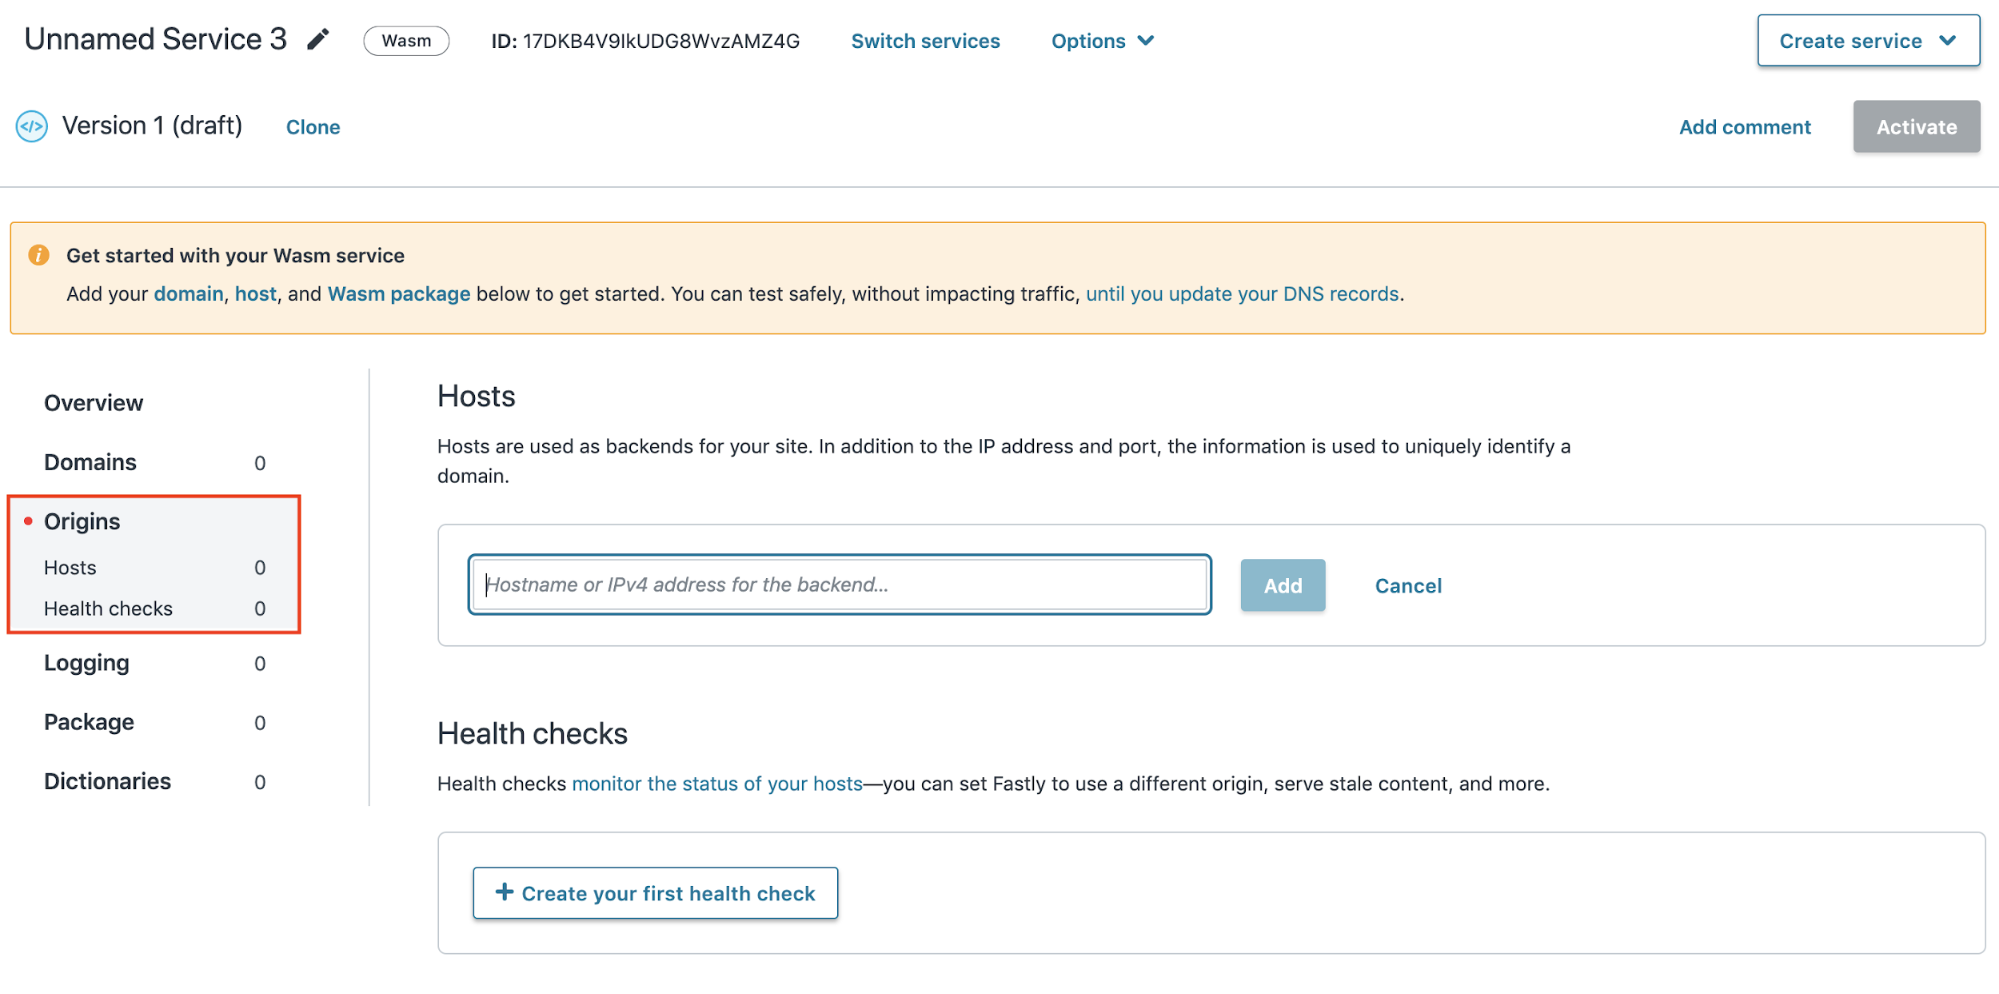
Configure the Origin Servers
The Edge application uses at least two origin servers:
- Your server, where all requests will be forwarded.
- HUMAN’s server, which communicates with the Edge application to flag suspected fraudulent activity.
It is also possible to configure multiple backend servers and use backend_header_key to redirect requests to the appropriate backend as needed.
To configure these servers:
Navigate to the Origins tab in the service sidebar, then add your server’s hostname to the Hosts section. Note that hostnames should NOT include an HTTP protocol NOR URL path information, e.g. “google.com” is valid, but not “https://google.com” nor “google.com/some/search”.
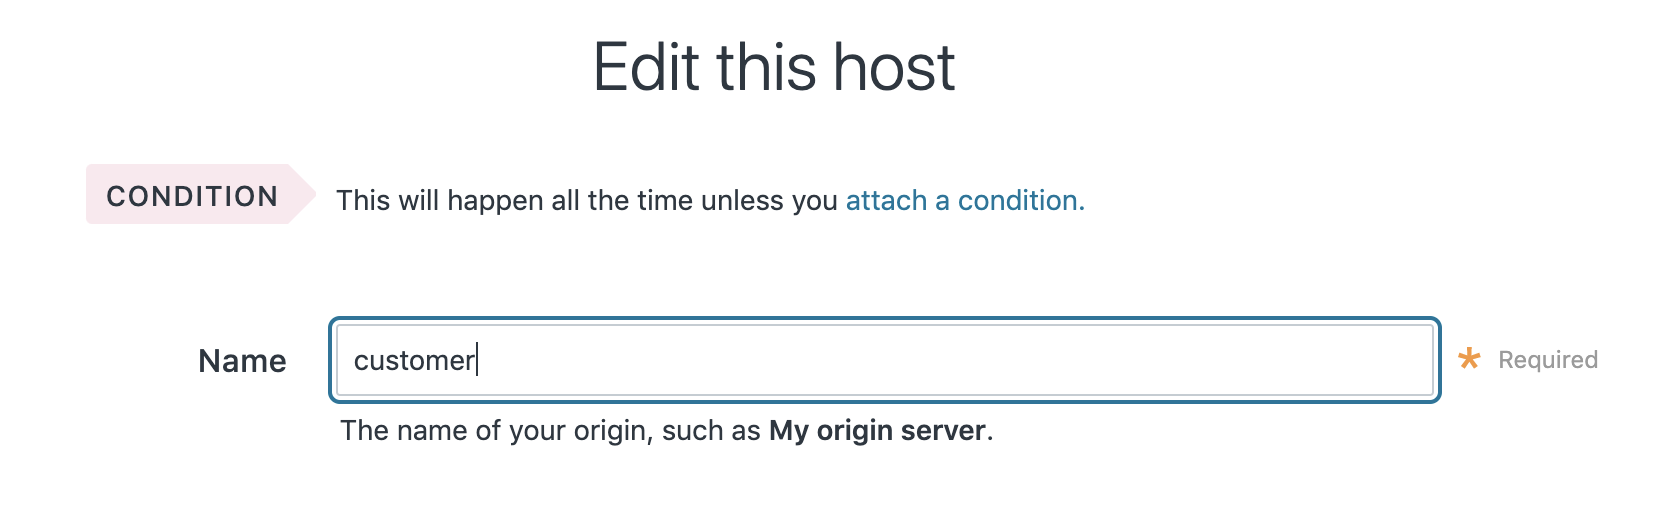
Select the pencil icon to edit the host.
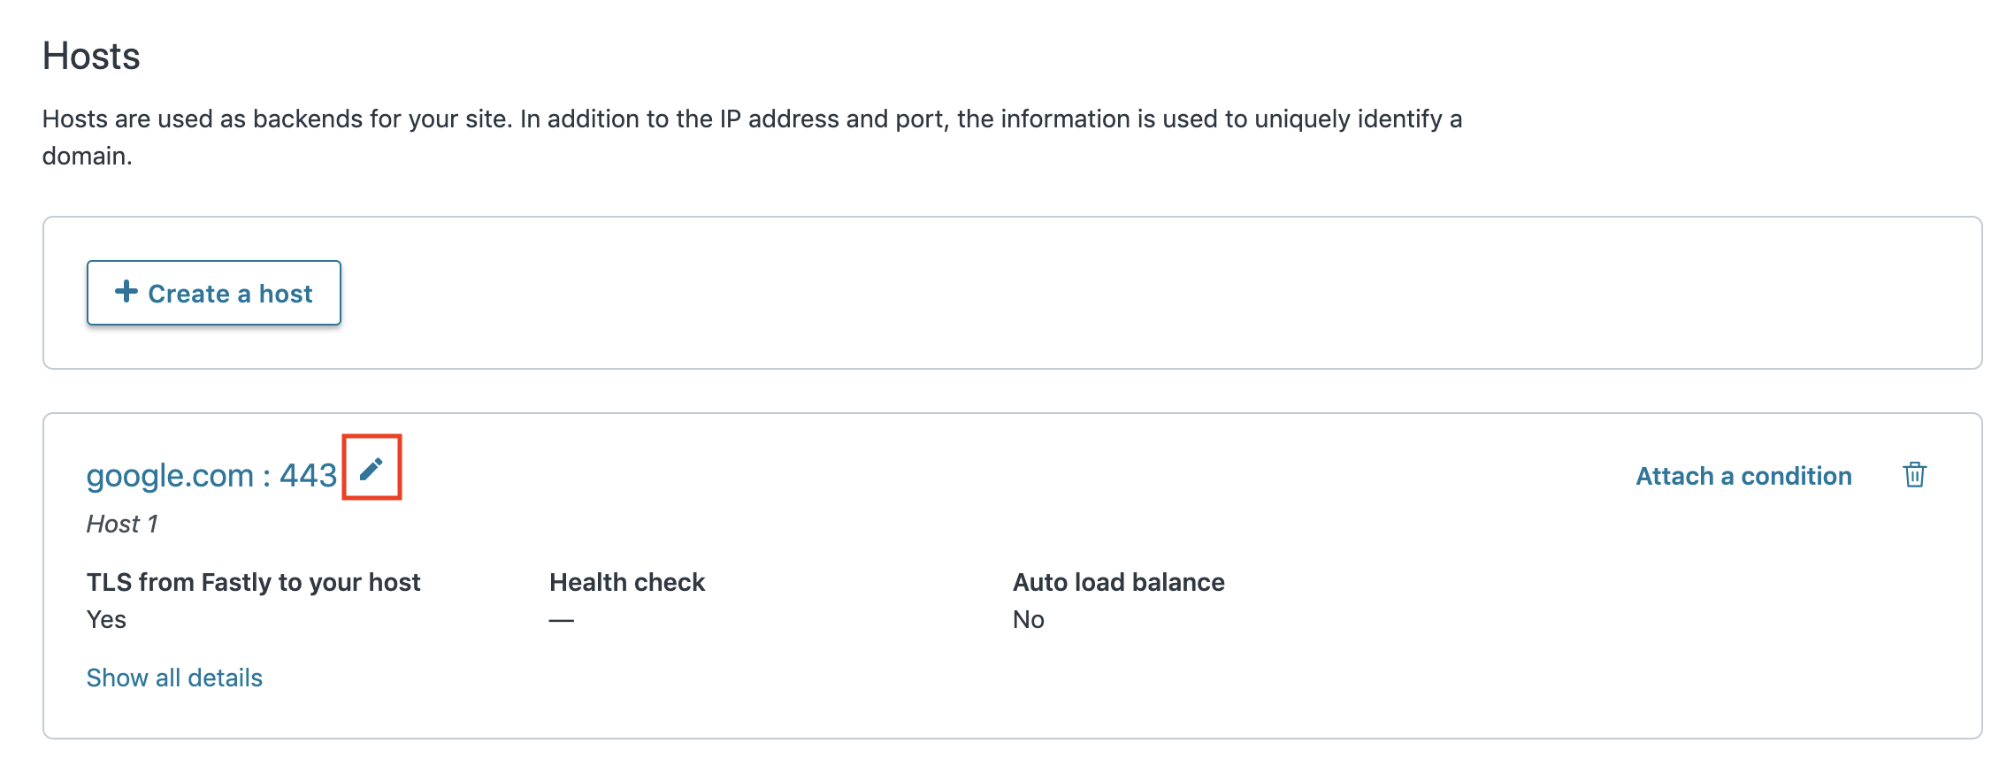
If you are using a single backend and no redirect based on a header then edit the Name field of your origin server and change its default value (e.g. “Host 1”) to “customer”. This name must be exact, as the Wasm package looks for the origin with the hardcoded name “customer” when routing requests.
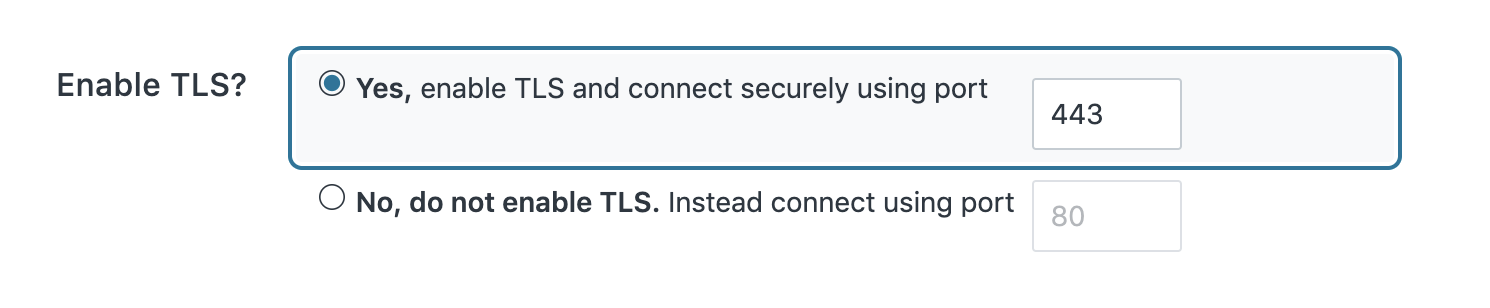
Verify that the TLS settings are correct. The defaults (enabled on port 443) will be correct for most use cases.
In the Advanced settings you can modify the Connection timeout parameter (default 1000ms). This is the maximum amount of time the request will be stalled in the HUMAN verification check. Detection will be skipped if the HUMAN Security Mitigation API takes longer than the timeout to respond.
Select Update to save your changes.

Repeat the previous steps (1 through 5) for the HUMAN decision server, by setting the hostname as the value of the “human_security_url” field (provided to you by your HUMAN representative) and by defining the name “human_security” instead of “customer”.
Configure the Log Endpoint (Optional)
You may wish to configure logging to help you diagnose errors and gain insight into the Edge application’s behavior. Fastly’s remote log streaming supports a variety of integrations (including Amazon S3, Apache Kafka, Elasticsearch, and FTP). For more information about remote log streaming, please consult this Fastly guide.
The HUMAN Compute@Edge Wasm package writes JSON logs to the endpoint log_endpoint. Here is an example of a JSON log written by the package:
{
    "service": "human-fastly",
    "message": "Matched request Request { version: HTTP/1.1, method: GET, url: Url { scheme: \"https\", username: \"\", password: None, host: Some(Domain(\"lively-absolute-calf.edgecompute.app\")), port: None, path: \"/block\", query: Some(\"x=16545\"), fragment: None }, headers: {\"host\": \"lively-absolute-calf.edgecompute.app\", \"content-length\": \"72\", \"user-agent\": \"python-requests/2.25.1\", \"accept-encoding\": \"gzip, deflate\", \"accept\": \"*/*\", \"content-type\": \"application/json\"}, body: Some(<opaque Body>), cache_override: None, is_from_client: true } to route Route { filter: RouteFilter { included_path_regex: ^/block$, excluded_path_regex: None, methods: [\"GET\"], query: {} }, event_kind: 0, form_id: None, action: AskHuman(AskHuman { block_with: Some(BlockWith { body: \"blocked\", status: 401, headers: {\"test\": \"whatever\"}, debug_vesper_body: false }), username_request_field: Some(RequestField { source: Body, key: \"/asdf\", batched: false, post_process: Sha1 }), request_fields_to_forward: [RequestField { source: Body, key: \"/a\", batched: false, post_process: Raw }, RequestField { source: Body, key: \"/b\", batched: false, post_process: Sha1 }, RequestField { source: Body, key: \"/c\", batched: false, post_process: IsEmpty }, RequestField { source: Body, key: \"/a/this\", batched: false, post_process: Raw }, RequestField { source: Cookie, key: \"cookie-whatever\", batched: false, post_process: Raw }, RequestField { source: Header, key: \"header-whatever\", batched: false, post_process: Raw }], ip_request_field: None, policy_name: Some(\"policy_a\"), referrer_request_field: Some(RequestField { source: Header, key: \"referrer_a\", batched: false, post_process: Raw }) }) }",
    "status": "DEBUG",
}
To configure the logging endpoint:
Navigate to the Logging tab in the service sidebar and select your preferred endpoint from the available list.
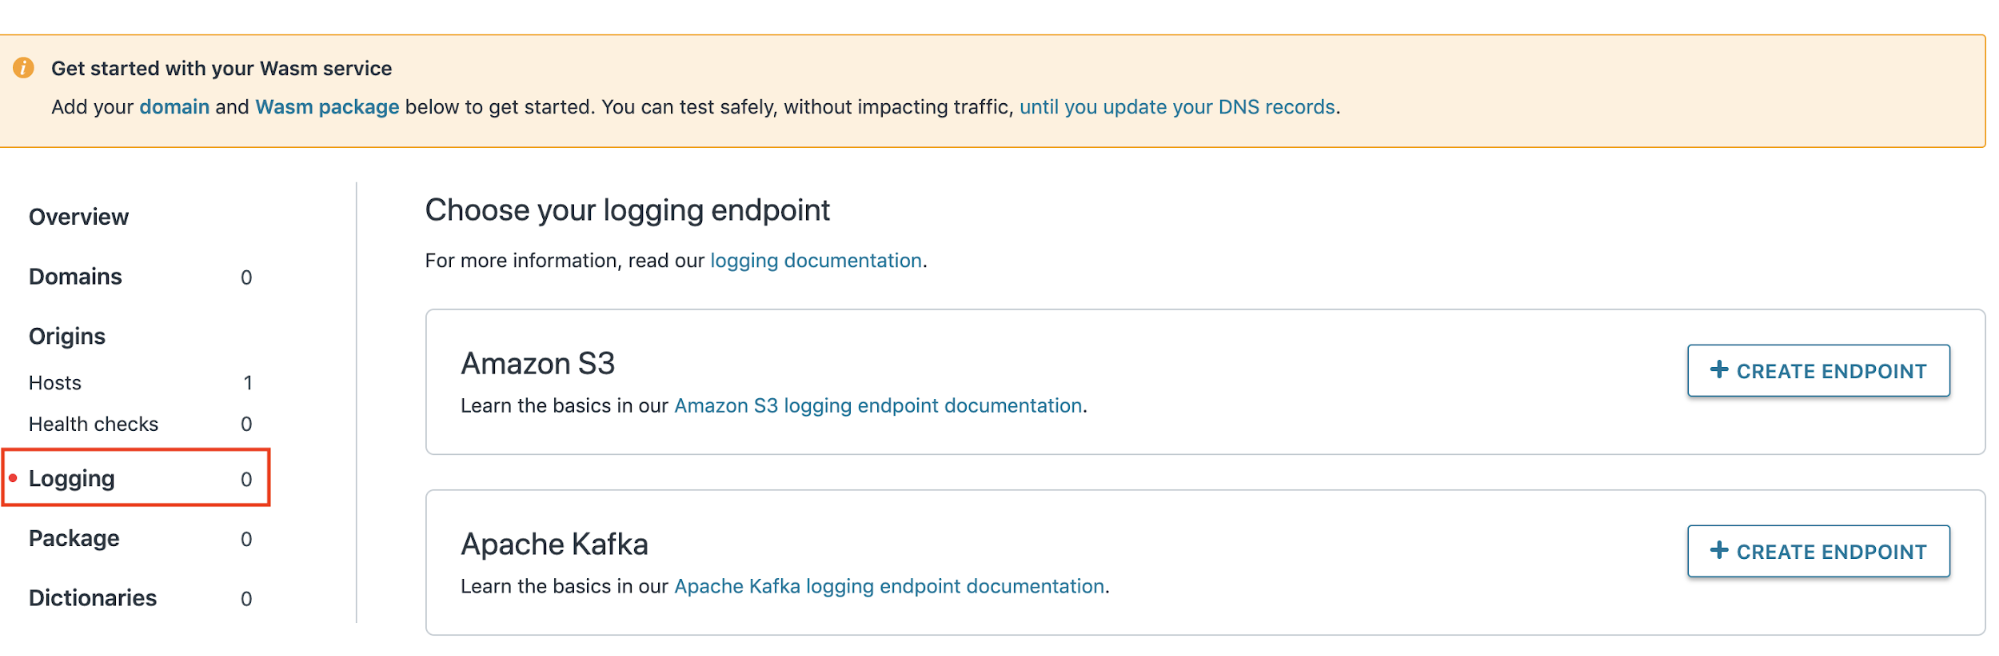
Name this endpoint log_endpoint.
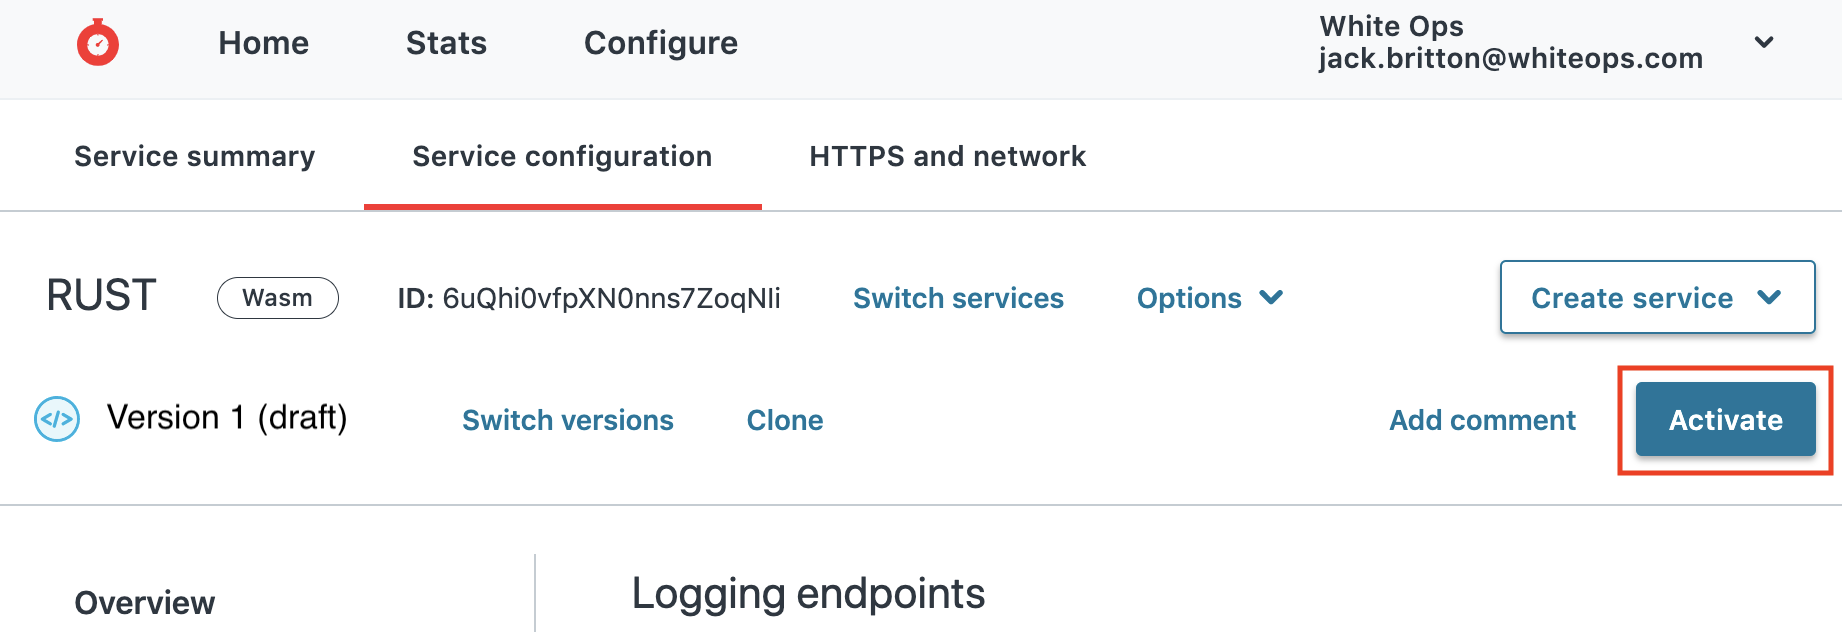
Activate the Service
- Select Activate in the upper right corner to deploy the service in production.
Integration Validation
Once you’ve configured and validated the Edge application, it is important to validate that the application is running properly and the protected event submission(s) loads as expected. To validate the application:
Visit the webpage where the code was deployed. Make sure to navigate to the page using every possible method (e.g., direct URL, via button, referral link) and by leveraging the following browser states:
a. Normal mode
b. Private/Incognito mode
c. Cleared browser local cache (to ensure the updated version of the website is retrieved)
d. Multiple browser types (ex: Chrome, Safari, Firefox)
- Each time you visit this webpage, interact with your HUMAN protected event submission(s) (i.e click button, fill form, enter credentials, etc).
- Submit the browser request for your protected event(s). It/they should behave as usual. If an error message is displayed, please contact your HUMAN representative for support.
- Verify that your backend systems are receiving form submission data as expected. If you encounter any issues please contact your HUMAN representative for support.
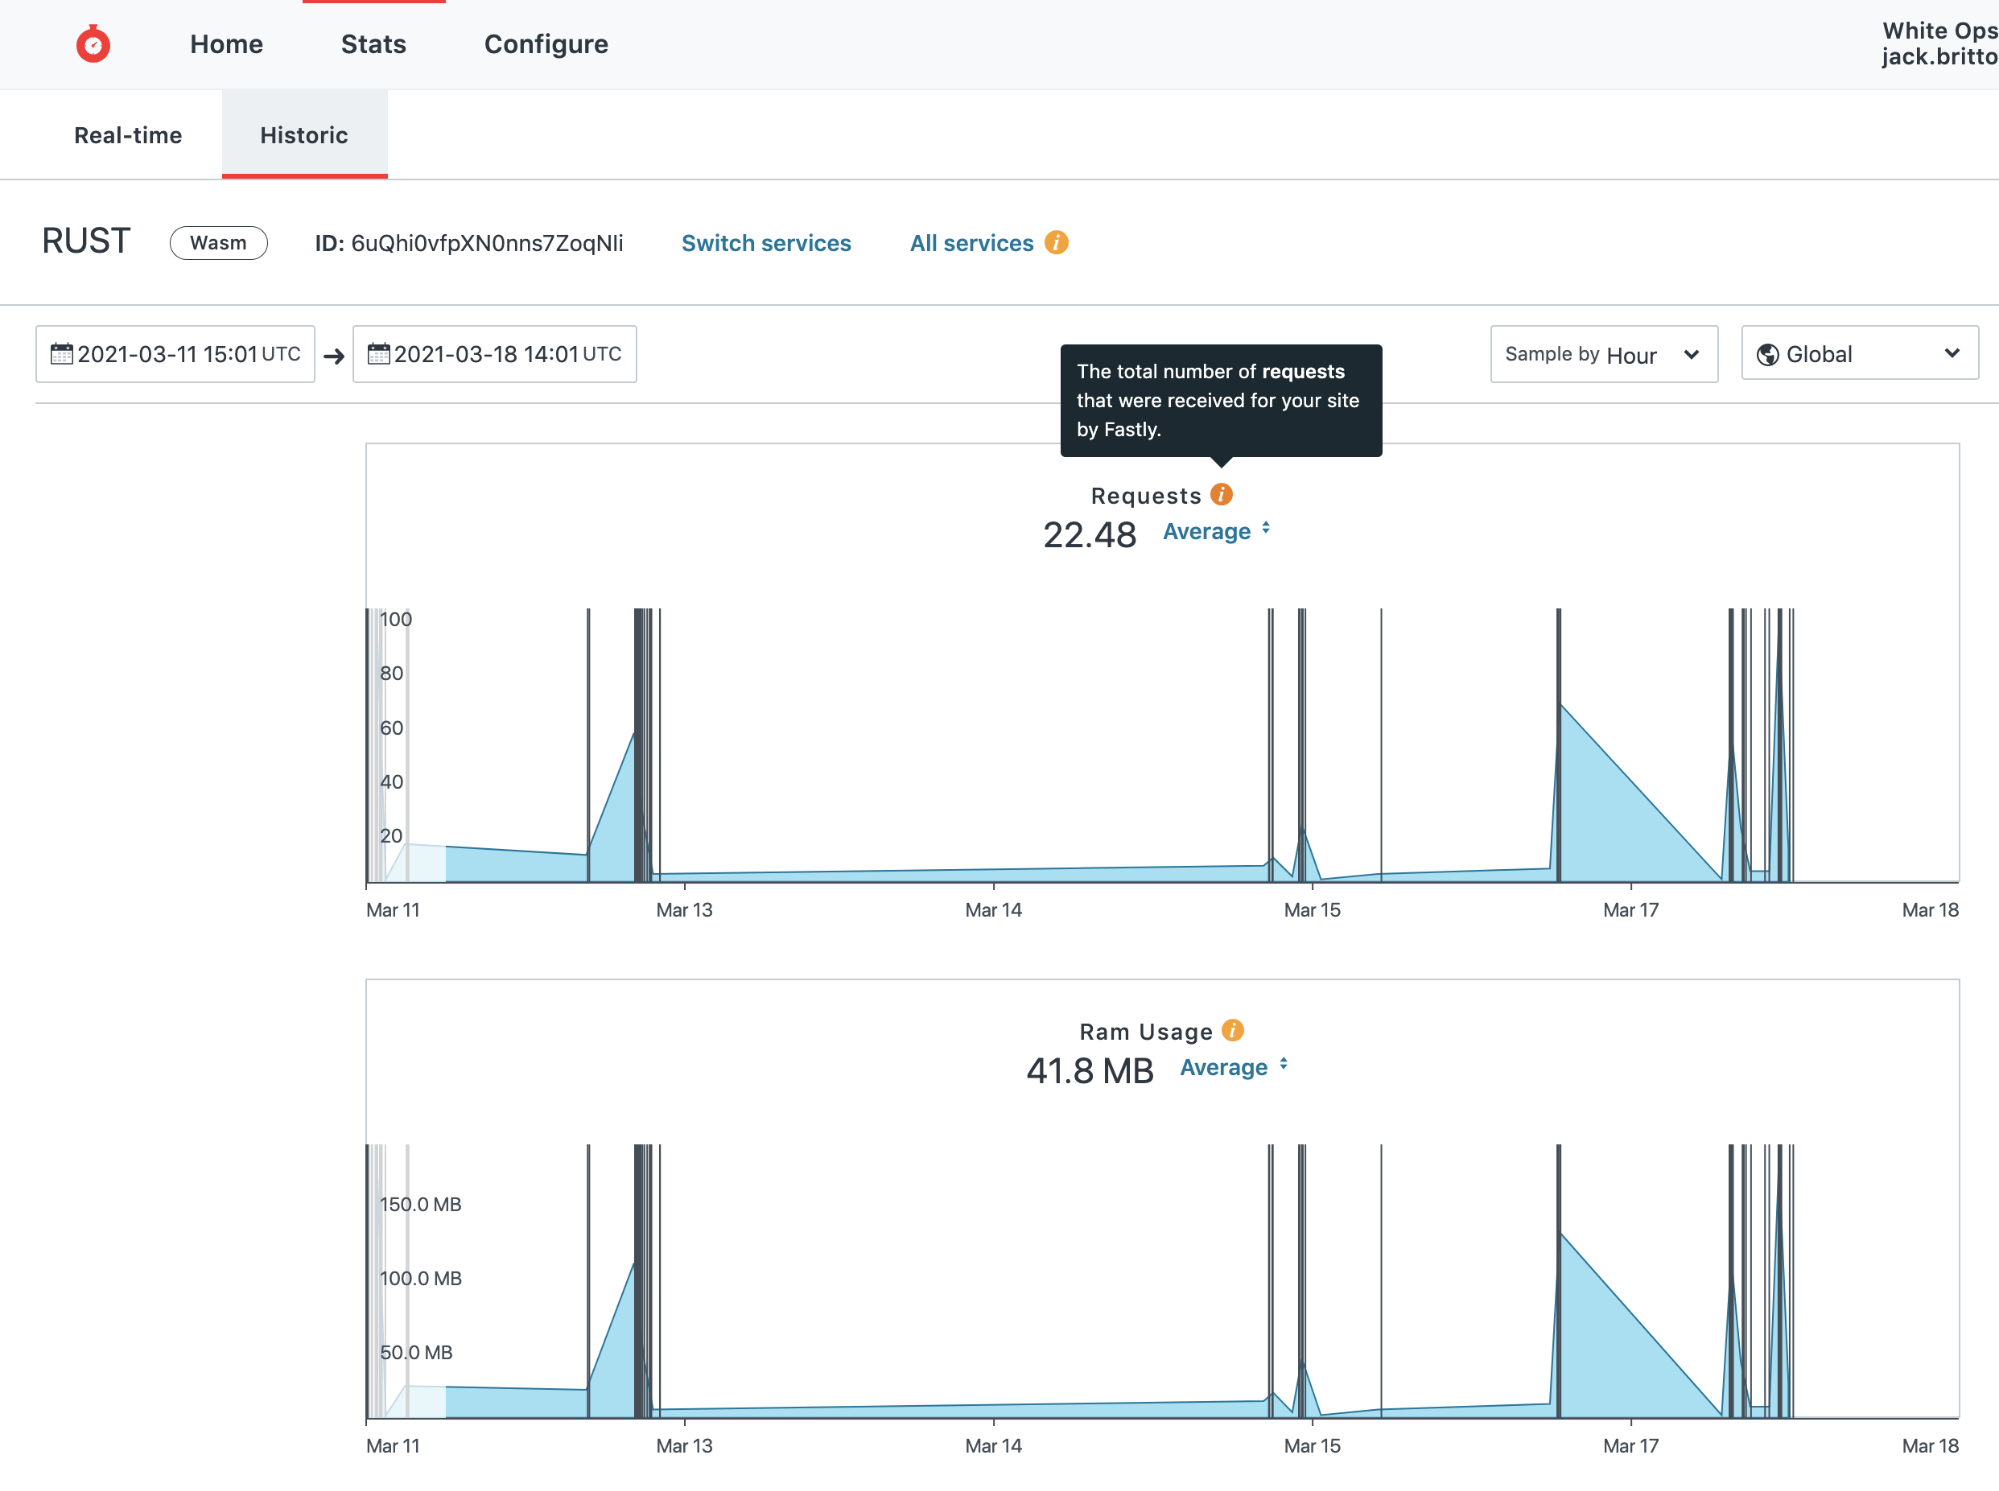
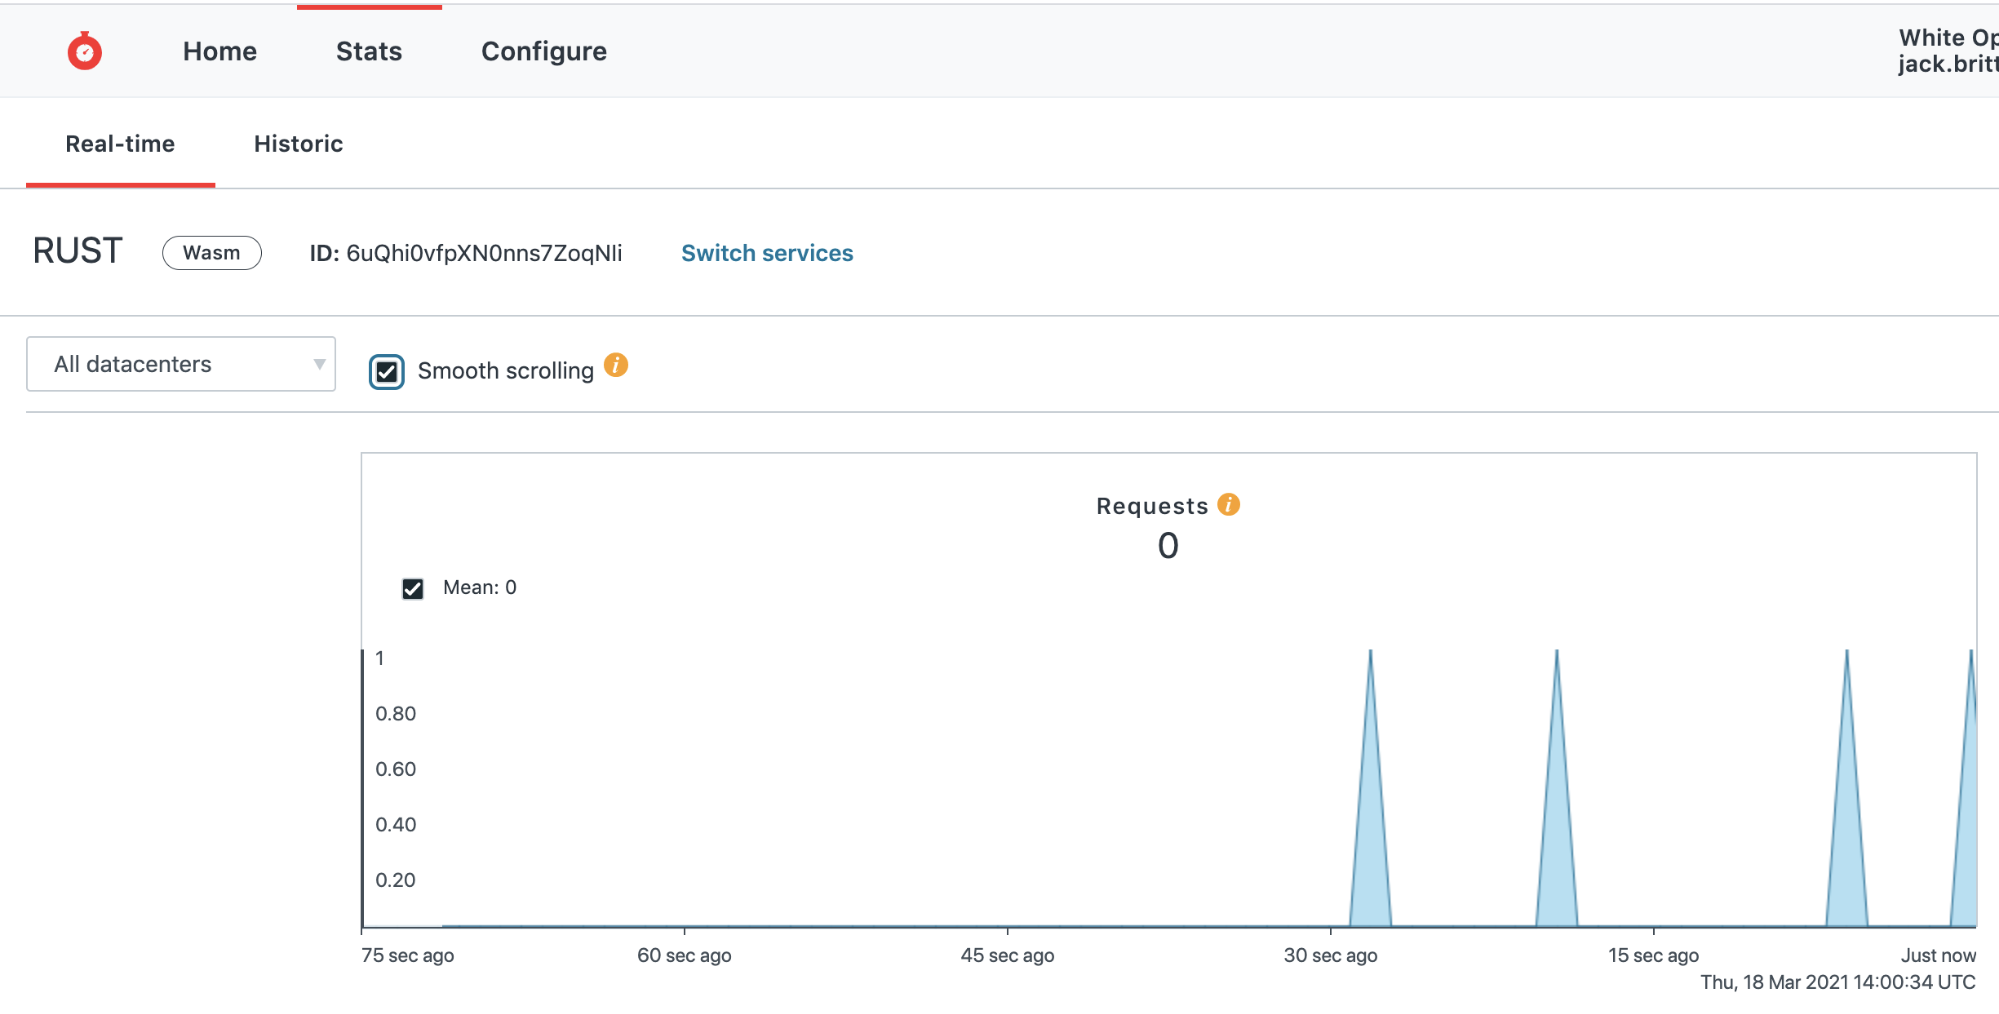
Check the real-time or historic stats in Fastly to ensure you are receiving successful events and requests.
If you configured the Log Endpoint, check your log source for any errors.
Monitoring
Fastly offers a web interface and API for historical stats. You can access this data by navigating to Stats > Historic in your service.